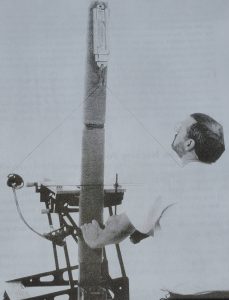
Figure 25. A Draw weight check can be made on a spring scale.
When the tiller measurements have been set to your satisfaction, the draw weight should be set (Fig. 25). The most common method for setting this is to use a spring-tension scale. Since the tiller measurements have been established you should be careful to adjust the top weight adjustment bolt and the bottom weight adjustment bolt the same number of turns. If they are adjusted the same, then the tiller will be unchanged no matter what the weight. For example, if you set the tiller adjustments at equal distances then they will remain equal to one another.
From this point on, both weight adjustment bolts should be turned the same number of turns when changing draw weight. The amount of weight change per turn is dependent on the wheel size, the pitch of the threads on the adjustment bolts, and the bow’s potential peak weight. The larger the wheel, the more weight change per turn. The heavier the draw weight, the more weight change per turn. As a rule of thumb, a compound with a 28-inch draw length will increase about five percent of its draw weight when the adjustment bolts are turned inward or clockwise one full turn. The bow will lose about five percent of its draw weight when the bolts are turned counterclockwise one full turn.
Setting The Nocking Point
When the tiller measurements and the draw weight have been set, then the nocking point can be placed on the bowstring with some degree of reliability. To have put it on before this would have been useless since adjusting the tiller distances would alter its position relative to the arrow rest.
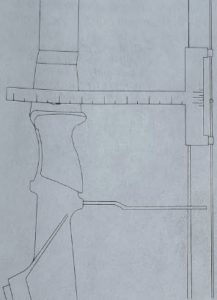
Figure 26. The initial nock point setting should be about 1/4″ above the level of the arrow rest.
At this point in the tuning of your bow, we need only a starting position for the nocking point. As the tuning process continues, it may become necessary to move the nocking point up or down from its original position. The recommended starting point should be about one-fourth inch above level (Fig. 26). This position should allow the bottom of the arrow shaft to be level to or above its resting place on the arrow rest.
To begin with, the arrow riding too low may give you some false readings in later tuning tests. Less drastic side effects occur when the arrow is riding too high. Remember that this is only a starting placement for the nocking point.
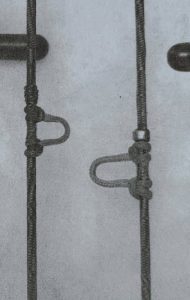
Figure 27. Nocksets and Loop: Be sure to use either a crimp-on metal nockset or a tie-on nock locator above the D-loop to prevent it from sliding up the bowstring.
More nock set rings are probably sold than any other accessory item in archery. They do the job. My only suggestion is to use two of them placed above the nock of the arrow (Fig. 27). This will give you a more secure setting which will be far less likely to slide up or down the string.
Another common method used is that of tying nylon serving thread on the string using single wraps with a knot on alternating sides of the string. Ten wraps are sufficient. Supporting this with a nock set ring is a good idea.
The knotted serving will not dig into nocks or leave marks on nocks and should also turn up and down the serving threads to allow fine adjustment of the nocking point. This type of nocking point should be covered with fletching glue so it becomes hard and durable. You must constantly be looking for adjustability while maintaining durability.
Patience, archer. You are not yet ready to shoot this creation you have built. The most important step is yet to come — setting the draw length to your body size. Before that is done, you might want to check everything we have done in setup to this point.
Cam Spacers: Do not overfill the space between the cam and the limbs with washers as the cam needs to run freely around the axle.
You should also check for comfort and noise in your bow. Perhaps a small amount of lubricant (Tri-Flon is recommended) is needed on the axles. Check to be sure that the wheels and spacers on the axle are not binding. This occurs when too many spacers are placed on the axle. The split limb tips, if your bow is of this design, could be spread apart by too many spacers, causing undue drag and thus poor performance (Fig. 28).
Check to be the axles have clip rings on both ends. Without them, you could end your shooting early today while you rounded up the parts.
TUNING YOUR COMPOUND BOW  (Paperback, 5-1/2” x 8-1/2”, 152 pages)
Invaluable bow tuning & shooting tips! High performance tuning for all cams, all compounds!
by Larry Wise, International Archery Champion & Archery Coach
To order TUNING YOUR COMPOUND BOW, go to www.targetcommbooks.com
Larry Wise, a world field archery and national target archery champion, and a good man in the deer woods, is one of the best — if not THE best — archery technicians in the world. He knows the bow tuning and performance problems archers and bowhunters encounter. He’s been there, done that…and SOLVED them.
He has given more than 350 compound bow tuning seminars in 36 states and four foreign countries.
He’s now also a top-level international coach.