How to develop a repeatable, consistent archery shooting form that takes strain off your muscles and puts it on your bones, where it belongs.
Part 2 of “What is Core Archery”: Defining Back Tension, Back & Shoulder Muscles, Defining “Full Draw” Position
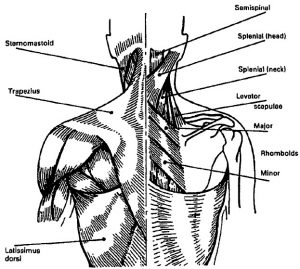
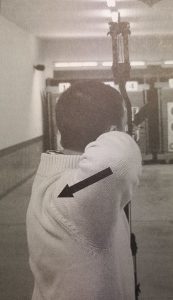
Figure 2. The important muscles of the back, as far as archery is concerned, are the rhomboids and levator scapulae. The trapezius is next in importance because it links the entire shoulder into a unit.
DEFINING BACK TENSION
Now that you know what your objective should be, you must learn to acquire it. To do that, you first need definitions of the two key items — “back tension” and “full draw position”. Understanding how these apply to your shooting form is critical to your success in implementing back tension.
BACK TENSION is the contraction of the dominant or drawing-side rhomboid muscles, aided by the levator scapulae muscle, which causes a micro sliding-rotation of the scapula toward the spine.
Contracting your draw-side rhomboid muscles will cause your scapula (shoulder blade) to slide and rotate toward your spine.
Figure 2 shows the location of these muscles and how the scapula is moved when they are contracted. The movement is small, but that’s why it’s easier to control and more consistent. Working these small muscles allows you to relax longer and more – difficult-to-control arm muscles that can be far less consistent to operate.
While the rhomboids and levator muscles are contracting, the trapezius muscle also contracts, locking the shoulder unit with the scapula, keeping them both close to the rib cage, and moving the draw-arm and hand enough to cause a release aid or a draw-check device to activate.
There it is. That’s the true objective of good form every time you nock an arrow. Every piece of your form must be geared to setting up the proper execution of back tension. If not, then whatever you’re doing is wasting energy or working against your performance. Worse, it can cause damage to your body, for which you’ll pay later.
As you read the next few chapters on building your form, keep this definition in mind. This definition is the main difference between the Core Archery system and other systems. Without the correct objective, other systems fall far short in their effectiveness. They also fall short in their ability to sustain your level of success over long periods of time. And when you do have those periods of struggle, you can work yourself out of them sooner because you know how all of your form steps must fit together to achieve the specific outcome of properly timed back tension. You always have that standard of comparison to measure against.
BACK AND SHOULDER MUSCLES
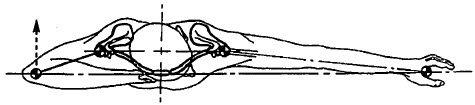
4. When the rhomboids, levator scapulae and trapezius muscles are contracted, they cause the upper arm and elbow to rotate about the shoulder joint, as shown.
Now, do you need to know these muscle names and locations? I think so; knowing more about your objective can help you better plan how you can achieve it. Learning where these muscles are located, what they feel like when you contract them, and how to position your body will enable you to get the most out of them.
Figure 2 shows the major and minor rhomboids along with the levator scapulae muscle. Contracting these muscles will rotate the scapula (shoulder blade) toward the spine. Because the scapula is connected to the shoulder, moving the scapula toward the spine causes the shoulder unit to pivot in the horizontal plane. The upper arm follows this pivot motion and the elbow is pulled backward in the horizontal plane, perpendicular to the shooting direction. The draw-arm and hand follow the shoulder, and this movement can efficiently and effectively be used to execute the release of the arrow.
Figure 2 also shows the trapezius and how it performs its function of keeping the shoulder blade close to the rib cage while linking the shoulder unit to the scapula. This link, when used properly, enables the short rhomboids to initiate a releasing sequence much more accurately and efficiently than longer and bigger muscles can.
DEFINING “FULL DRAW” POSITION
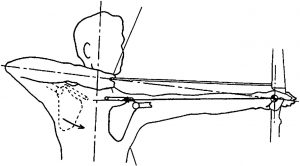
5. Notice that in proper full-draw position the drawing forearm is in line with the arrow, thus allowing the “holding” to be fully transferred into the back muscles.
Question: What happens immediately before you execute back tension?
Answer: You must reach full draw position.
So how far do you draw your bow to make this happen? That depends on you and how you fulfill the following definition.
6. Once again, when the rhomboids, levator scapulae and trapezius muscles are shortened during contraction they will cause the upper arm and elbow to rotate about the shoulder joint. The anatomy of the shoulder allows the upper arm to rotate naturally about the shoulder joint in a plain titled about 30 degrees from horizontal as shown here. Learning to establish this rotational force without unnecessary muscle tension gives you the ability to steady while executing the release with highest level of finesse and accuracy. You will work smarter rather than harder! Proper setup and execution of the back-tension process allows the release hand to follow through directly away from behind the arrow.
FULL DRAW POSITION is the position to which you draw the bowstring, using proper body alignment, in order to place your scapula in the most effective position for executing back tension.
As mentioned earlier, good archery is about maintaining proper body position throughout each step of the shooting act. The next-to-last step in this act is getting the scapula into position near — but NOT as close as it can get — to the spine. The scapula must be able to move a small amount when you contract your rhomboids, otherwise, this contraction will be ineffective and your arms will still have to perform the shot execution.
The full-draw position must be established according to illustrations 4, 5, and 6. In these illustrations, you can see that the drawing forearm and elbow are (top view) in line with the arrow. This position allows the holding effort to be fully transferred into the back muscles while positioning the scapula near the spine. It’s critical that your bow fits your position.
Your full draw position can have various secondary reference points on your face and neck that you can use to increase consistency in reaching full draw. However, primary attention should be placed on the position of the drawing-side scapula and shoulder unit. Most archers I know misfocus on the touchpoint on their face or jaw and never consider the placement of their scapula. In other words, they focus on getting anchored and not on back tension. Without proper focus, they do not get the most consistent results.
WHY FORM STEPS
Once you accept properly executed back tension as your objective, you must also realize that there must be the best way to reach it. This best way consists of Form Steps which you must learn and practice.
Organizing these steps is essential. These steps must be done in a precise order and with precise movements to maximize the results. They also must take into account the differences between body shapes and sizes. Keep that in mind as you outline the steps of good form.
– – – – – – – – – – – —
HERE ARE THE FORM STEPS, explained chapter by chapter in the book CORE ARCHERY:
Chapter 2: Stand / Build Your Form
It covers stance, testing your stance in relation to your shooting objective, nocking the arrow in relation to your shooting objective, bow hand position and which hand part to use, stop-sign technique, bow handle physics, the pointing strategy, setting the bow hand, elbow rotation in relationship to your shooting objective, release hand in relationship to your shooting objective, head and shoulder position in relationship to your shooting objective.
Chapter 3: Drawing Your Bow
This chapter covers raising the bow, visual contact in relation to your shooting objective, the draw in relationship to your shooting objective, and full draw position in relationship to your shooting objective.
Chapter 4: Aim and Release
Aim/contract/aim, sight line-up in relationship to your shooting objective, contract, aim in relation to your shooting objective, release, follow-through, system re-set.
Chapter 5: Learning Back Tension
Why use a back-tension release aid, release dysfunction, how the tension release works, why does the tension release solve release dysfunction, starting with a back-tension release aid, be patient – do not rush this process, selecting a back-tension release aid, safe draw, using the back-tension release with a bow, further practice.
Chapter 6: Muscle Activity During Back Tension
Back tension review, what was measured, what happened, interpreting results.
Chapter 7: Aiming and Sighting
Better aiming yields all-around success, aiming and sighting, aiming better, bow fit, sight picture, body position, physical conditioning, your conscious mind.
Chapter 8: The Mental Game of Core Archery
Three mind functions, premise & mental plan —
a – recreational
b – learning: questions to answer, practice structure, warm-up, blank bale practice, scoring round, bow tuning, end-of-practice blank bale shooting, cool down, record keeping, step-by-step learning, conscious thinking-20 practices-task retention;
c – high performance: the hailstorm, sample mental plan, conscious mind as a positive partner, conscious mental plan, practice your plan.
 Special Insert: The Shot Sequence in Digital Images
This is a unique ninth chapter utilizing 44 photos of one shot to show you the steps of a good archery shot as that shot is being built. The photos are on 44 consecutive right-hand pages (pages 31-117) and spring to life as you thumb rapidly through them. Study the flow from one image to the next to identify how each of the 12 form-steps leads into the next.
Photos are made from a 30-second video of the author making one well-executed shot
CORE ARCHERY, Shooting With Proper Back Tension…is A GROUND-BREAKING BOOK, the first guide ever written on this topic.
Your shooting form will repeat if you are using your core — your spine — correctly. The book TELLS you and SHOWS you HOW to develop and use mental mastery to build a winning shooting form step by step, WHY you must use your skeletal structure properly, and WHY you must build mental skills to master Core Archery.
When your form is physically complete and practiced so it operates through your subconscious mind, then you must develop good mental skills to help you score high under all conditions. With CORE ARCHERY, you can do this! On the target range and when bowhunting.
Larry Wise is a world field archery and national target archery champion, and probably the best ARCHERY TECHNICIAN in the world. He’s also a top-level archery coach and an excellent teacher.
Order the book CORE ARCHERY by going to the publisher’s website — www.targetcommbooks.com
Good shooting…and good hunting in the seasons just ahead.